


Albion 3-Point Fueller

-842-p.jpg?v=7b0ce7d1-41f6-48a7-8641-66648361c982)
-842-p.jpg?v=7b0ce7d1-41f6-48a7-8641-66648361c982)
-842-p.jpg?v=7b0ce7d1-41f6-48a7-8641-66648361c982)
Kit Review
This is a brand-new tooling from Airfix and it joins their ever-expanding range of 1/48th RAF ground equipment. Inside their usual style box you will find one clear and four-grey coloured sprues. These contain eight clear and 105 grey-coloured parts. The instructions are in the now familiar Airfix style and construction is achieved in 55 stages. Although the instruction include a colour rendition of the single painting guide, which seems a waste of coloured ink we feel, they still fail to have a simple sprue layout map, which in this instance would be very useful.
Assembly is straightforward, and the bulk of the main assemblies can be made up in a two hour session. I found that it is best to build to a stage where you can then spray the overall colours, which means you can get the chassis built up quite a bit before you need to spray it all black (the front mudguards will need to be masked and sprayed Light Olive though). Detail is excellent, and the fit of the main parts is good, but you will note that things like the axle to springs have no pin locators, one just sits on top of the other and that is all well and good, but the leaf springs don't have solid location either, so they can bow in our out. It all makes for a rather sloppy build and I thus recommend that you get the spring and axle in situ together as soon as you can to ensure it all lines up. I also found that most of the pins on things like the exhaust pipe front manifold (D05), don't match the size of hole in the mid/rear exhaust pipe (B11), and that seems common with a lot of the parts. The starting crank handle (A27) is too long at the engine side to allow you to get the front holes to line up with those in the chassis, so trim it a bit after dry-testing it. I also have to say that I found the front of the engine block and the way the fan belt was attached all a bit 'lacking', both in precision of fit and detail, as the engine block front is just that, a flat panel with a vertical join line in it.
I skipped the wheel assembly in Stage 19 and went on to build up the cab. Stages 20 to 22 can be done, as can Stages 24 and 25 without fitting the glass or steering wheel. It is then time to get the paint out and start spraying. I had a look to see if there was a equivalent of Humbrol 86 Olive Green, but there is not in the Gunze-Sangyo or Tamiya ranges, so I dug out a pot of the real thing. Thinned with cellulose it is sprayed on to all the main components and then left overnight to cure. The chassis was sprayed with Tamiya NATO Black with shadows added with pure black.
I have to admit that I found the fit of the rear tank in stages 38 and 39 to be poor, resulting in a large gap along the length of the unit due to the 'step' nature of the seam. It may have been me, but this type of seam as opposed to the traditional butt-joint with pins does require precise tooling and moulding, and my bits just would not fit? A quick fill with Perfect Putty, then a wipe with a wet cloth soon filled the gaps though. The radiator (D10) is shown painted, which I am sure it would be in wartime, but I wanted a little 'colour', so opted to do the inner core is a brass shade lightly sprayed over a black base coat, whilst the rest of the unit was sprayed with Tamiya X-33 Bronze. All the feed pipework and controls in the rear of the tanker built in stages 32 to 36 were also picked out in this colour, just to break up the otherwise drab green monotone. The tread boards (A05, B01 and B14) were sprayed with a light tan colour, then a wood effect was achieved by 'dragging' a dried brush of a dark brown (Mahogany) paint over the top to create the grain. This was sealed with acrylic varnish and some PVA was dabbed on to later create chips. Once that was dry the top Olive Green went on and before it had fully cured, a toothpick was used to remove the PVA applied to the edges etc. and create wear. You can also, very lightly, then sand back the top coat with 12000 grit Micromesh, but take care not to go all the way through to the plastic, and this created a 'scuffed' look. Paint chipping on the rest of the (metal) areas was done with a fine brush and a dark grey (e.g. Dark Sea Grey) paint.
I was not 100% taken with black as the colour of the feed pipes on the three arms (B05, B06 and B07), so I went with a tan colour, then applied a wash of Burnt Sienna oil to give it a more organic look: this may not be 100% accurate, but it gives some interest to what would be big black pipes otherwise? The arms were positioned in the stowed configuration, but the rear doors were cut and posed open, just to show the interior detail, I also opted to have a cabin door open, to show the interior. The leather effect on the seat cushions by the way is a light tan base coat, over which I apply dabs of a very dark brown paint (Mahogany) that is heavily thinned. You can use oil paint, such as Burnt Umber if you wish, but again it must be heavily thinned and dabbed on.
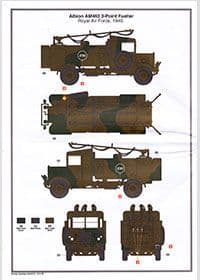
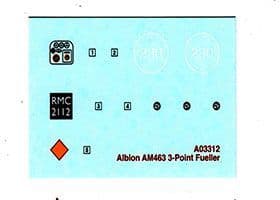 The kit comes with one decal option, a generic 'RAF' scheme with the numberplate 'RMC 2112'. The only other markings are the stencils on either side of the tank body, the mustard gas patch on the upper driver's side mudguard, the dials in the rear compartment and the main driver's instrument cluster in the cab. The overall scheme is a camouflage pattern of Olive Green and Dark Green and as already mentioned the former is only really available as Humbrol 86, whilst the latter you will find in most paint ranges, as it's standard WWII era RAF Dark Green as used with Dark Earth etc. on aircraft.
Conclusion
A neat kit, you can add more if needs be such as wiring in the cab, or even separate foot pedals etc., but from the box this will make up into a neat little model that you can either display on it's own, or with a suitable aircraft (I certainly recall early WWII era press photos showing one of these refuelling Blenheim Mk Is). The Albion chassis will have other potential uses, which I am sure Airfix will exploit and I can only hope they continue this little fascination with WWII ground equipment; can you imagine a Queen Mary trailer in this scale, or how many subjects they can get from the Bedford Q-series and AEC Matador chassis!
Buy it, build it and enjoy.
This is a brand-new tooling from Airfix and it joins their ever-expanding range of 1/48th RAF ground equipment. Inside their usual style box you will find one clear and four-grey coloured sprues. These contain eight clear and 105 grey-coloured parts. The instructions are in the now familiar Airfix style and construction is achieved in 55 stages. Although the instruction include a colour rendition of the single painting guide, which seems a waste of coloured ink we feel, they still fail to have a simple sprue layout map, which in this instance would be very useful.
Assembly is straightforward, and the bulk of the main assemblies can be made up in a two hour session. I found that it is best to build to a stage where you can then spray the overall colours, which means you can get the chassis built up quite a bit before you need to spray it all black (the front mudguards will need to be masked and sprayed Light Olive though). Detail is excellent, and the fit of the main parts is good, but you will note that things like the axle to springs have no pin locators, one just sits on top of the other and that is all well and good, but the leaf springs don't have solid location either, so they can bow in our out. It all makes for a rather sloppy build and I thus recommend that you get the spring and axle in situ together as soon as you can to ensure it all lines up. I also found that most of the pins on things like the exhaust pipe front manifold (D05), don't match the size of hole in the mid/rear exhaust pipe (B11), and that seems common with a lot of the parts. The starting crank handle (A27) is too long at the engine side to allow you to get the front holes to line up with those in the chassis, so trim it a bit after dry-testing it. I also have to say that I found the front of the engine block and the way the fan belt was attached all a bit 'lacking', both in precision of fit and detail, as the engine block front is just that, a flat panel with a vertical join line in it.
I skipped the wheel assembly in Stage 19 and went on to build up the cab. Stages 20 to 22 can be done, as can Stages 24 and 25 without fitting the glass or steering wheel. It is then time to get the paint out and start spraying. I had a look to see if there was a equivalent of Humbrol 86 Olive Green, but there is not in the Gunze-Sangyo or Tamiya ranges, so I dug out a pot of the real thing. Thinned with cellulose it is sprayed on to all the main components and then left overnight to cure. The chassis was sprayed with Tamiya NATO Black with shadows added with pure black.
I have to admit that I found the fit of the rear tank in stages 38 and 39 to be poor, resulting in a large gap along the length of the unit due to the 'step' nature of the seam. It may have been me, but this type of seam as opposed to the traditional butt-joint with pins does require precise tooling and moulding, and my bits just would not fit? A quick fill with Perfect Putty, then a wipe with a wet cloth soon filled the gaps though. The radiator (D10) is shown painted, which I am sure it would be in wartime, but I wanted a little 'colour', so opted to do the inner core is a brass shade lightly sprayed over a black base coat, whilst the rest of the unit was sprayed with Tamiya X-33 Bronze. All the feed pipework and controls in the rear of the tanker built in stages 32 to 36 were also picked out in this colour, just to break up the otherwise drab green monotone. The tread boards (A05, B01 and B14) were sprayed with a light tan colour, then a wood effect was achieved by 'dragging' a dried brush of a dark brown (Mahogany) paint over the top to create the grain. This was sealed with acrylic varnish and some PVA was dabbed on to later create chips. Once that was dry the top Olive Green went on and before it had fully cured, a toothpick was used to remove the PVA applied to the edges etc. and create wear. You can also, very lightly, then sand back the top coat with 12000 grit Micromesh, but take care not to go all the way through to the plastic, and this created a 'scuffed' look. Paint chipping on the rest of the (metal) areas was done with a fine brush and a dark grey (e.g. Dark Sea Grey) paint.
I was not 100% taken with black as the colour of the feed pipes on the three arms (B05, B06 and B07), so I went with a tan colour, then applied a wash of Burnt Sienna oil to give it a more organic look: this may not be 100% accurate, but it gives some interest to what would be big black pipes otherwise? The arms were positioned in the stowed configuration, but the rear doors were cut and posed open, just to show the interior detail, I also opted to have a cabin door open, to show the interior. The leather effect on the seat cushions by the way is a light tan base coat, over which I apply dabs of a very dark brown paint (Mahogany) that is heavily thinned. You can use oil paint, such as Burnt Umber if you wish, but again it must be heavily thinned and dabbed on.
The kit comes with one decal option, a generic 'RAF' scheme with the numberplate 'RMC 2112'. The only other markings are the stencils on either side of the tank body, the mustard gas patch on the upper driver's side mudguard, the dials in the rear compartment and the main driver's instrument cluster in the cab. The overall scheme is a camouflage pattern of Olive Green and Dark Green and as already mentioned the former is only really available as Humbrol 86, whilst the latter you will find in most paint ranges, as it's standard WWII era RAF Dark Green as used with Dark Earth etc. on aircraft.Conclusion
A neat kit, you can add more if needs be such as wiring in the cab, or even separate foot pedals etc., but from the box this will make up into a neat little model that you can either display on it's own, or with a suitable aircraft (I certainly recall early WWII era press photos showing one of these refuelling Blenheim Mk Is). The Albion chassis will have other potential uses, which I am sure Airfix will exploit and I can only hope they continue this little fascination with WWII ground equipment; can you imagine a Queen Mary trailer in this scale, or how many subjects they can get from the Bedford Q-series and AEC Matador chassis!
Buy it, build it and enjoy.
